print technologies

Creating print data - tips and tricks

Time and again we are asked what to look out for when creating print data. Together with our print partners, we have tried to put together a few tips and tricks for you:

PDF Creation in General

  • Print data must be created in a layout program (InDesign, Illustrator). Word, PowerPoint, Excel, etc. data are NOT suitable for printing
  • Export your layout data as a print PDF X/3 or X/4
  • Choose the correct profile: ICC Profile> in our download section. Download and install the correct color profile (InDesign) and activate in the document
  • Reduce all layers to the background layer
  • Make sure all images are embedded with a resolution of at least 300 dpi if these have been used 100%. We recommend 1000 dpi for outlines
  • Embed fonts or convert them into paths
  • Pay attention to the bleed all around, usually 3mm
  • Avoid print, register, fold and cut marks in the file, as these may also printed. Don’t put frames or outlines around the file
  • Name PDFs clearly and meaningfully
  • Do not encrypt the print file and do not use password protection


Color Management

  • Color application: Make sure the total application does not exceed 300% and does not fall below 5%
  • Pay attention to layout. If possible, try to avoid areas of high colour saturation touching unprinted areas. It is almost inevitable that the color will deposit on the unprinted areas
  • Choose the right color space:
    • For 4/4 and 4/0 color products: CMYK
    • If RGB data is delivered, it must be considered that these will usually be automatically converted to CMYK. This will lead to color deviations, for example bright RGB colors on screen will appear paler on the printed product
    • In the case of B/W products, data must be supplied in grayscale. If there are colored elements in the file, they will be automatically converted to grayscale
    • Pure black: C=0, M=0, Y=0, K=100
    • Deeper blacks can be achieved by adding other color components (but then it is no longer a B/W product)
  • Spot colors: CMYK may not be used for products that include an exclusive or special color. For special spot colors, make sure to correctly name the color channel or color field with the desired color value. (Color type: full tone). In most cases, spot colors must not be created in the “Overprint” mode. Otherwise, the color after printing will not correspond to the special color shown in the HKS or PANTONE fan
  • RISO: Please refer to our Riso printing recommendations


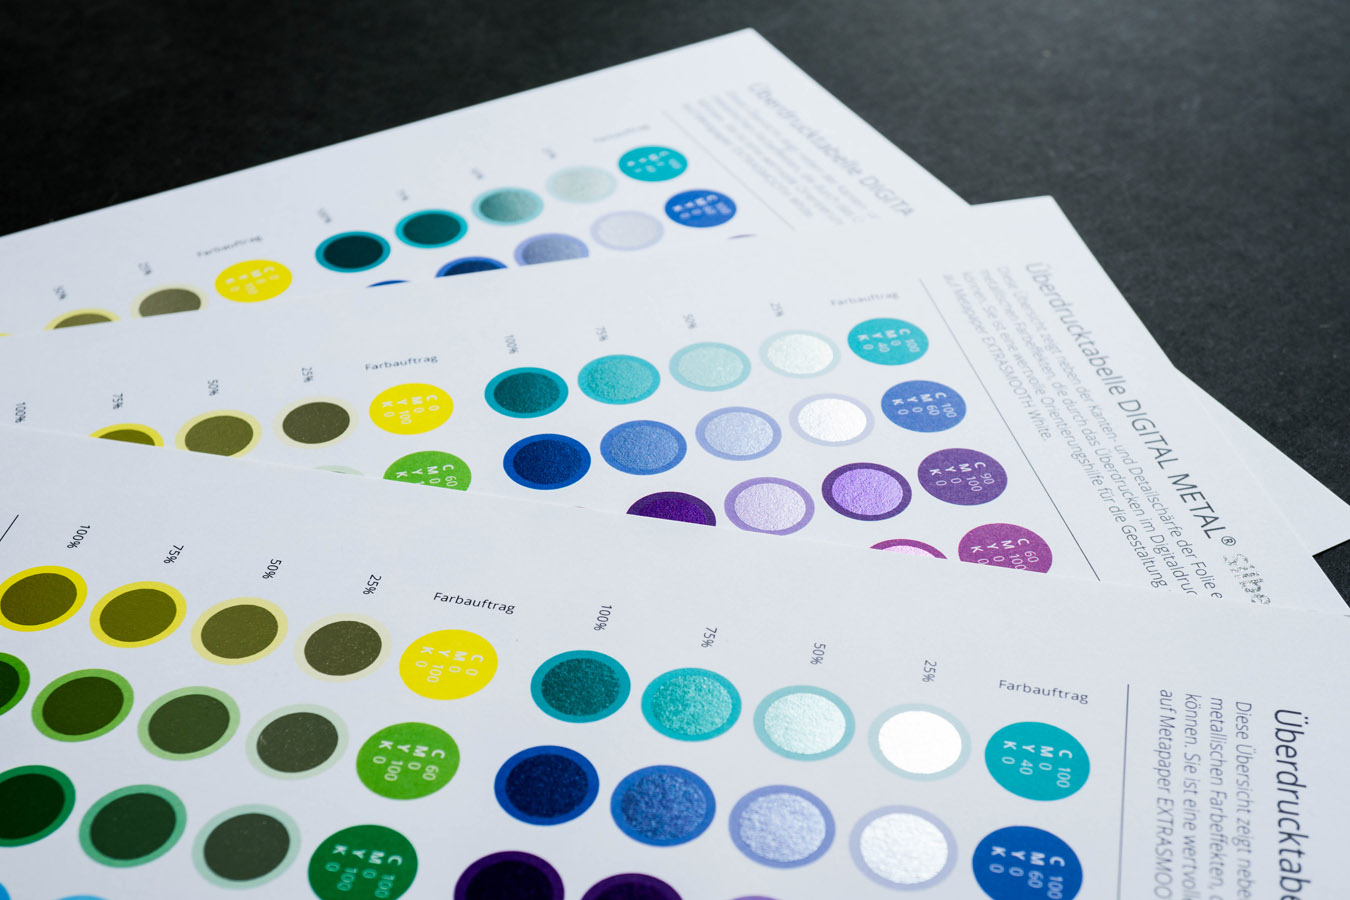
Finishing (lacquer/embossing/laser)

  • For refinements, the full tone colors must be applied overprinting
  • Check how your color field is laid out, for example: “varnish”, color type: full tone, color value, for example 100% cyan
  • Note that colors may appear to change due to varnishing
  • Please consider when creating design elements:
    • line width at least 3pt (1,06mm)
    • font size at least 12pt (thinnest line in typeface at least 1mm)
    • space between elements of relief-painting: at least. 3 pt (1,06mm)
    • distance to final format and all punch, grooved, and crease lines at least 3mm


Special features for each processing/binding

Patently obvious, but to be on the safe side:

  • the number of pages for brochures with staples must be divisible by 4.
  • For brochures with layflat, spiral or adhesive binding, the number of pages must be divisible by 2.


Saddle stitching

  • Transfer the print PDF with consecutive individual pages (NOT with imposed sheets) in 2 files (cover / content)
  • When folding brochures with many pages, a step effect, the so-called collar gain, can occur as the pages in the middle of the brochure are pushed outwards. When creating the print data, consider the increase in the gutter so that objects close to the edge such as page numbers, lines and other elements are not cut off, or too close to, the edge of the paper.


Adhesive bindings (Softcover)

  • Transfer the print PDF with consecutive individual pages (NOT with imposed sheets) in 2 files (cover/content)
  • We or your print shop will be happy to help you determine the correct residue
  • Specific features:
    • Caution with images or layout elements that run across the binding edge. A few mms might “disappear” in the binding edge!
    • The content block is glued to the envelope on the spine. Allow 6.5mm to be pasted over on the first and last page of the content pages as well as on the inside of the cover, which will drop out as a visible design area and should not be printed in order to enable durable gluing - it is best to take this into account in your layout


Layflat-Brochures

  • Transfer the print PDF with consecutive double pages (exception!) In 2 files (cover/content)
  • Your layout will be printed across the binding edge without “interruption”


Wire-O:

  • Transfer the print PDF with consecutive individual pages
  • Note the distance for the spiral (approx. 10-15mm) to ensure the punching does not go through important elements!


Envelopes


Folded flyer

  • Caution: with 6-page flyers, the type of fold must be considered when creating
  • the page size:
    • Spiral fold: folded side must be shortened
    • Zigzag fold: all pages have the same size. Best make a dummy and check the dimensions


Business Cards Multiloft

  • Avoid solid areas up to the edge of your layout (as the color can easily burst when cut)
  • Cut-outs and embossing should be at least 5mm away from the edge, otherwise they will impair the solid bonding
  • Find more info about Multiloft here.


Good luck! And if you have any questions, please always get in touch. 

Cookies help us to improve the website and offer you the best possible service. By using this website, you agree to the use of cookies.